Before starting a flare, the end of the tube should be carefully prepared for flaring. The end must be straight and square with the tube and the burr from the cutting operation removed by reaming.
Fig. 2-11 illustrates the steps necessary to prepare a tube for flaring. First, use
a smooth cut file to square the end of the tube. Use great care that no filings enter the tubing. Next, use a burring reamer to remove the slight burr which remains after
the cutoff operation.
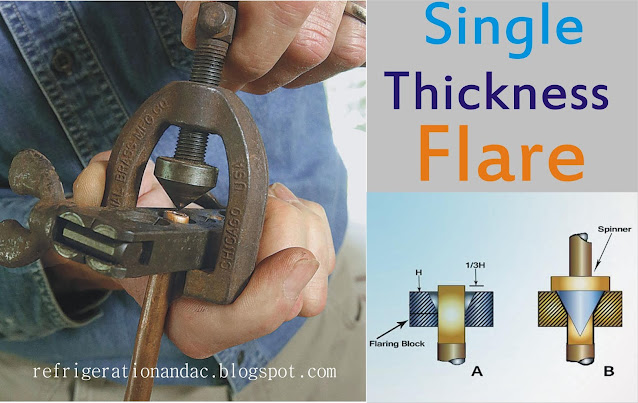
A single-thickness flare may be made with a flaring tool as shown in Fig. 2-12.
To produce a flare of the correct dimensions using a chamfered flaring block, proceed as follows:
Insert the tube in the flaring tool so that it extends above the surface of the block as shown in Fig. 2-13A. This is to allow the sufficient metal to form a full flare If the tube extends above the block more than the amount indicated, the flare will be too large in diameter and the flare nut will not fit over it, If the tube does not extend above the block, the flare will be too small and it may be squeezed out of the fitting as the flare nut is tightened. Fig. 2-138 shows a completed flare as it is formed in the
flaring tool.
To form the flare, first put a drop of refrigerant oil on the flaring tool spinner where it contacts the tubing. Tighten the spinner one-half turn and back it off the one-quarter turn. Advance it three-quarters of a turn and again back it off the one-quarter turn. Repeat the forward movement and back off until the flare is formed.
Some serviceman makes the flare using one continuous motion of the flaring cone;
that is, without a back-and-forth motion,
It is believed by some that the continuous turning of the cone, without back turning, may work to harden the tubing and make it more susceptible to splitting.
Some servicemen prefer to use a flare which is not completely formed, about
seven-eighths complete, and depend on tightening the flare nut on the flare to
complete it.
Under no circumstances tighten up the spinning tool too much because this will thin the wall of the tubing at the flare and weaken it considerably.
A word to the beginner--always place the flare nut on the tube in the proper position before the flare is made because it cannot, in most cases, be installed on the tube after it has been flared.


